Efficiency in Blender
This tutorial will help you fix errors and improve modeling skills all around. This is not a tutorial on how to model, how to set up models for exporting, or how to make them work in game. This is a sequel to Darkstar's tutorial that will help you solve common errors as well as make your models better and your skills more efficient. I will update this with more problems as well as tips if you post them.
Chapters:1. Strange Lighting
2. Texturing
Tips, tricks, and others1. Strange lighting
A common problem with blender models for begginers is that the lighting is wacky. Some parts are darker, some are lighter, and for some the lighting is backwards.
This could be caused by a variety of reasons, all easy to fix if you have patience.
One of the most common problems is scaling in object mode. When you scale in object mode, the lighting gets reversed. The side of the model facing the sun is dark, when the side away form it is light. To fix this, do the following:
- Create a new cube
- De-select everything you have selected
- Right click on one part of your model (in object mode), then right click on the cube. Make sure nothing else is selected except the one part of your model and the cube.
- Hit Ctrl J and join the one part of your model with the cube. The model part and the cube should now be one object.
- Go into edit mode and delete the cube
- Repeat this for each part of your model
Annoying and time consuming isn't it?
Tip: What I do is I take all parts of the model that use the same material, and join them together using ctrl J. That way I don't have to do this for each part of the model. If you want to do this as well, be sure not to join animated parts with non animated parts, or things will get messed up.
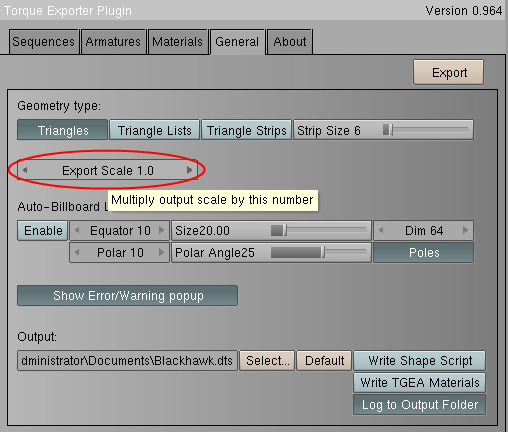
You probably scaled in object mode once you realized your model was not in scale with the blockhead. There is another fix to that. The exporter comes with a scale bar. Use that to scale the whole model.
Another common reason for this is backfaces. Backfaces are sort of like a one way window. You see out one way, but can't see back in the other way. Blender usually can determine which way to make a face face, but sometimes for more complicated things. In solid view mode, you cannot see backfaces, and you model appears normal
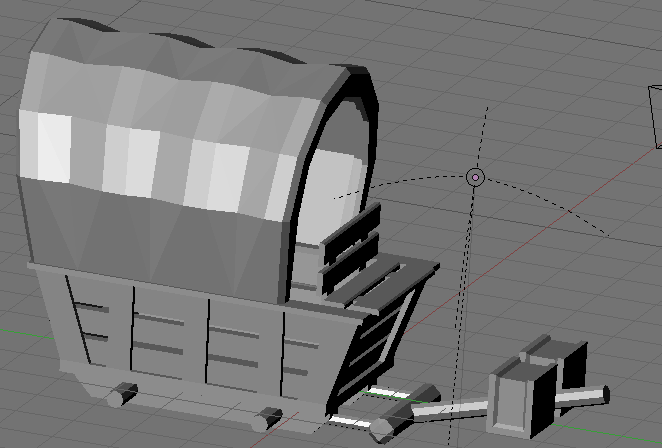
To see them, you have to go into textured view mode.

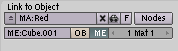
Change the red cricled cube to textured. Now you may see a a ton of holes in your model.
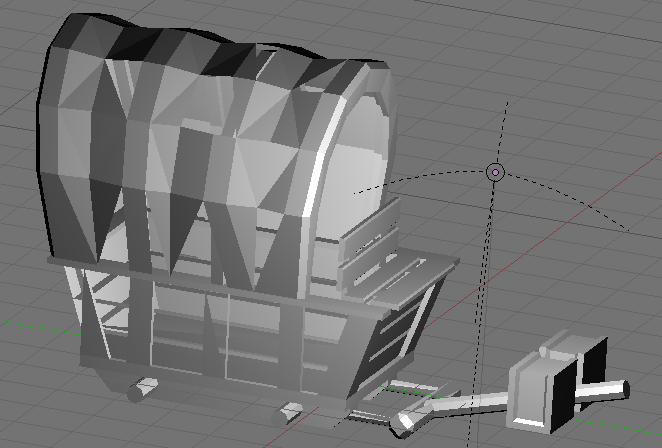
These are backfaces.
- Select the object and go into edit mode.
- Go into face select mode(The triangle button next to the 4 dots and the 2 lines)
- Select the backfaces by holding down shift and clicking them. Holding down shift allows you to select multiple faces, vertices, or edges at once.
- Hit Ctrl F and flip the faces. Keep doing this until you fixed all the backfaces you can find.
2. Texturing
Darkstar has a texturing "tutorial" but it isn't an effective way for texturing solid colors. His is used for putting pictures on models, such as a logo. Texturing is really easy. Go into object mode and then hit the shading button.

If your model doesn't already have a material, hit add new. None of the buttons matter, this is all for visibility in blender. The only thing that matters is the name of the material.
Name it whatever you want. Add multiple materials for as many amount of colors as you want by hitting the up arrow to the left of the material's name, then hitting "ADD NEW"
Open your favorite image making program and set the size to 16x16. Make colors representing each of the names of the materials. Save each in the folder of your add-on. You should have a variety of 16x16 png files in your folder. If you need help understanding what to do, open up the gun's .zip and look inside for png files.
Tips, tricks, and others
List of useful hotkeys- Bevel: W-Bevel. (Try this on a cude to see good results)Hit W and select bevel. Move the mouse, then click. This can be used to make neat edges for more blocky models.
- Triangles to Quads: Alt J. One of the useful things in blender is, unlike milkshape, faces can be made out of 4 vertices or 3. Milkshape can only use 3. This reduces polys in blender and makes editing easier.
- Mirror: Ctrl M, (X Y or Z). Hit ctrl M first, then hit X, Y, or Z to mirror.This is useful for making a half of something, then merging it with the opposite half.
- Merge: Alt M. This can be used to merge vertices together to make spear tips and other things as well as reduce polygons. Try it out to see what I mean.


