Making Gui's
Something not many people know how to do...
Introduction
I have decided to make this tutorial because there are barely any recent ones on this topic. I have recently started to learn how to make GUIs myself, but I think I know enough now to teach other people how to make GUIs. In this tutorial I will:
- Explain how to get the Mod Editor in the first place
- Explain what some of the different controls are
- How to get those cool looking round buttons
- What the various characteristic controls do
- How to make your buttons do things
- How to do various other things
- Give you some references
So here we go.
*NOTE* The
[number] boxes indicate that the thing I'm talking about can be found in the diagram at the bottom, so if you have some trouble and need help visualizing it, check the diagram down there and look for the labeled part you are looking for. They also have links to the diagram part of this tutorial *END OF NOTE*
Index
and all that jazz
To use this index, press cntrl f and type in the code that pertains to the specific part you are trying to find:
[GT1] -------------- Gui's and what they are
[GT2] -------------- Starting out, getting mod editor
[GT3] -------------- Making your own GUI
[GT4] -------------- "Characteristic Controls"
[GT5] -------------- THE DIAGRAM
[GT6] -------------- The... Gallery?
[GT7] -------------- Some other Gui Controls
[GT8] -------------- The final words
Gui's
And what they are...
[GT1] Gui stands for
Graphic user interface, which is exactly what this is. Everything you see right now, all the windows on your computer are GUI's. Gui's make it easy to interact with programs and such without having to type console commands and such. Instead of typing a function into the console like:
findClientByname("Blah").player.kill
You can press a button that carries out that specific function. Now you know how in Blockland we have commands like /magicwand? Well that admin wand button on the Admin menu GUI carries out the function to give you that admin wand as if you were typing it in game. You can create Gui's to make it easier for
The rest of us to use your add-on, plus I think it's fun to make them. It (if you have a need for a Gui) can put your Add-on above the rest.
Starting out
Getting Mod editor
[GT2] The first step to being able to make your own GUI's is to get the GUI editor which comes with the Mod editor. Now to get mod editor you need to do a simple shortcut change for Blockland. First, you right-click the Blockland shortcut on your desktop, and then on the drop-down menu, click properties. You go into the target text box and add to the end of C:\Blockland\Blockland.exe, -mod editor. So in the end it should look like this: C:\Blockland\Blockland.exe -mod editor. Dont change anything else and then click OK at the bottom and you should be able to open Blockland and press f10 to open the GUI editor and press f11 for mission editor. *NOTE* My computers OS version is Windows Vista, and as Truce said, XP installs Blockland into Program files which has a space in it. So if you use Windows XP, you will need to put "" (quotes) around the path file in order for it to not get screwed up. So it should look like this:
"C:\Program Files\Blockland\Blockland.exe" -mod editor

Making a GUI
getting to the meat...
[GT3] Now load up Blockland and press f10. You can use the drop down menu
[1] at the top to look through various other GUIs for the game. Now once you are done looking through those, you can get on to making your own. To make your own, you click on the file button
[2] in the top left hand corner and click New Gui. A menu should pop up and on this, you name your GUI. For this, just name it Testgui and then click Create. Now on the new menu you should see a turquoise color. To make new controls, you obviously click New Control
[3] and then click on the drop-down menu, what new control you want to put in your GUI. Before we get to creating the GUI, I am going to go through some of the GUI controls that I know and what they do:
- Gui Bitmap cntrl With this, you can insert pictures in png format into your GUI
- Gui Bitmap Button cntrl With this, you can insert different button designs
- Gui button cntrl Not very pretty, but it is a button.
- Gui check box cntrl Obvious, it makes a checkbox
- Gui Ml text cntrl Makes a ml text insert thing
- Gui ML text edit cntrl Does that ^^^ only you can edit it in game.
- Gui slider cntrl Makes a slider that you can control things with
- Gui scroll cntrl its a scroll bar! One of my favorite controls.
- Gui Slider control This allows you to increase a number and decrease using the buttons it comes with
- Gui swatch control This does nothing, its simply for aesthetics, makes GUIs cool lookin
- Gui various text cntrls Various regular text controls
- Gui Window cntrl Probably the most important control, its the window!
These are the basic controls that you will need to become familiar with to make cool GUIs. Although I wont be going through how to use all of them, I will be going through most of them. Now, I am going to go through the steps to making your own Gui. First off, start by click the New control button and on the drop-down menu, click
Gui Window Control and change it to whatever size you want to and try to center it. Here is what it should look like:
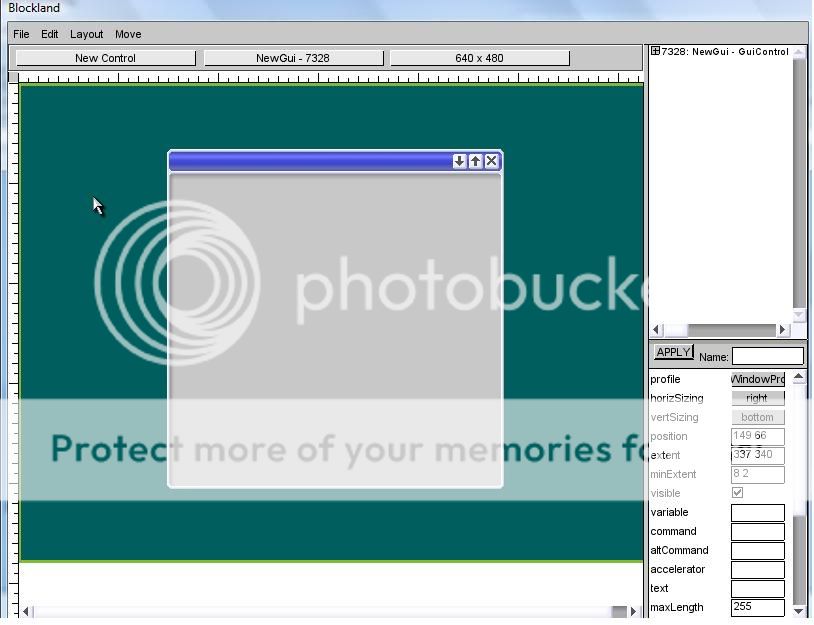
Now that we have that done... Oh wait! You see that menu to the right-hand side? With all those text boxes and stuff? Well those boxes control the aspects of the object they apply to. See the text
[4] box? Well, in that box you can type in the text you want to appear on the Control. So type Test Gui and then click apply and in the top left hand corner of the GUI window, it should say Test Gui. But wait! Were not done! We have to add buttons and stuff like that! So lets do that right now. Before you add that new button control, right click the window control to parent the button to the window control. Doing this makes it so that the new control is mounted on the Window and a part of the window. If you did that right, a colorful outline
[5] should appear around the window. So after doing that, click the New control button again and choose one of the two button controls. I prefer bitmap button controls since you can change what they look like and make your GUI look pretty. So pick Bitmap button! DO IT! Now, position it anywhere you want. And you might notice that it's an ugly gray box with the button text running off, let's fix that. So in the aspects window
[6] look for the thing at the top that says:
Profile. Click on that and change it to Blockbutton profile and then click apply. Then you can change the button text to whatever and then we come to making it those cool rounded buttons. To do this, you need to scroll down the aspects menu until you find
bitmap. In that box, type this:
base/client/ui/button1
And then click apply again. It should look cool now! But one problem, it's white. You can fix this by typing in a standard RGB color code with alpha (transparency) to make it green, you would type in the mcolor box:
0 255 0 255
The first number is the intensity of red, the second is the intensity of Green, the third is the intensity of Blue, and the last number is the transparency. So mess around with that if you want. Now find the
command box for the button control. In this, type in: Testcommand(); and we'll get to that later in the scripting. Now go back and click the GUI window control and type in the command box: canvas.popdialog(Testgui);
and that is the command to close the window, then find the
Accelerator box and type into that: escape. These two last steps will allow us to close the window by pressing the Esc button on our keyboard. Then type in the
close command box the same thing you typed in the command box: canvas.popdialog(Testgui); And now it seems we are done. Other things you could do are:
Insert a Gui swatch control to make it look pretty, make sure to change the color to something like 175 175 175 255 and then parenting it to the GUI window, and the parent the button to the swatch control. You could also insert a text control to title it more. And there are many more controls you can experiment around with. I'll also teach you to use some of the other controls later on. Now hit save and choose a directory to save it in, I would save it in Add-ons. Here is my final finished GUI:

I know, it's hideous, but once you (and I) get better, we can make cooler looking GUI's.Now before you ex out of the GUI editor, make sure to change the GUI back to Main Menu GUI and then quit normally. Now we get to the coding part. Go to your add on's folder and open the GUI file you just made in Notepad, it should look something like this:
//--- OBJECT WRITE BEGIN ---
new GuiControl(Testgui) {
   profile = "GuiDefaultProfile";
   horizSizing = "right";
   vertSizing = "bottom";
   position = "0 0";
   extent = "640 480";
   minExtent = "8 2";
   visible = "1";

   new GuiWindowCtrl() {
      profile = "GuiWindowProfile";
      horizSizing = "right";
      vertSizing = "bottom";
      position = "149 66";
      extent = "337 340";
      minExtent = "8 2";
      visible = "1";
      command = "canvas.popdialog(Testgui);";
      accelerator = "escape";
      text = "Test GUI";
      maxLength = "255";
      resizeWidth = "1";
      resizeHeight = "1";
      canMove = "1";
      canClose = "1";
      canMinimize = "1";
      canMaximize = "1";
      minSize = "50 50";
      closeCommand = "canvas.popdialog(Testgui);";

      new GuiSwatchCtrl() {
         profile = "GuiDefaultProfile";
         horizSizing = "right";
         vertSizing = "bottom";
         position = "59 52";
         extent = "223 53";
         minExtent = "8 2";
         visible = "1";
         color = "175 175 175 255";

         new GuiMLTextCtrl() {
            profile = "BlockChatChannelSize7Profile";
            horizSizing = "right";
            vertSizing = "bottom";
            position = "4 9";
            extent = "223 29";
            minExtent = "8 2";
            visible = "1";
            lineSpacing = "2";
            allowColorChars = "0";
            maxChars = "-1";
            text = "CLICK DA BUTTON";
            maxBitmapHeight = "-1";
            selectable = "1";
         };
      };
      new GuiBitmapButtonCtrl() {
         profile = "BlockButtonProfile";
         horizSizing = "right";
         vertSizing = "bottom";
         position = "97 181";
         extent = "143 46";
         minExtent = "8 2";
         visible = "1";
         command = "Testcommand();";
         text = "PUSH ME";
         groupNum = "-1";
         buttonType = "PushButton";
         bitmap = "base/client/ui/button1";
         lockAspectRatio = "0";
         alignLeft = "0";
         overflowImage = "0";
         mKeepCached = "0";
         mColor = "255 0 255 255";
      };
      new GuiBitmapCtrl() {
         profile = "GuiDefaultProfile";
         horizSizing = "right";
         vertSizing = "bottom";
         position = "20 163";
         extent = "65 64";
         minExtent = "8 2";
         visible = "1";
         bitmap = "base/client/ui/planterrors_small/planterror_limit";
         wrap = "0";
         lockAspectRatio = "0";
         alignLeft = "0";
         overflowImage = "0";
         keepCached = "0";
      };
      new GuiBitmapCtrl() {
         profile = "GuiDefaultProfile";
         horizSizing = "right";
         vertSizing = "bottom";
         position = "249 164";
         extent = "65 64";
         minExtent = "8 2";
         visible = "1";
         bitmap = "base/client/ui/planterrors_small/planterror_limit";
         wrap = "0";
         lockAspectRatio = "0";
         alignLeft = "0";
         overflowImage = "0";
         keepCached = "0";
      };
   };
};
//--- OBJECT WRITE END ---
Now before you close this, type in this under the //---OBJECT WRITE END --- part:
function pushtestgui(%Gui)
{
   %Gui = canvas.pushDialog(Testgui);
}
This is the function to open it, well bind the test key later. Now save this and send it to a .zip file named Script_Testgui and then we go to the coding side. Open up the ol' Notepad and type in this:
exec("./Testgui.gui");
moveMap.bind(keyboard, "m", pushTestgui);

function testcommand()
{
	MessageBoxOK("Thanks!","You have just pressed a button on a test GUI!");
}
Now this should make a keybind where if you press m it will open the GUI. Now once you have that done in Notepad, save it as a Client.cs and put it in the zip along with the GUI. Make sure to package that with a description.txt and then open up Blockland again. Look in the console for any syntax errors and then load up a server. Once you load, press cntrl m and see if it pops up. If it does, you did it! If it doesn't, go back through the steps again and see what you did wrong. And there you have it, your first GUI! It may not do much (Open a window that says thanks for clicking the button) but, I hope that it started you off. From here you can make more and more advanced GUI's and have some fun making them, I have made several myself and coded some of them. I'll show them later (at least my good ones.) Anyway, now we go to the other parts of this tutorial
Characteristic controls
and what they do...
[GT4] Now you might have noticed all of those "Characteristic controls" on the right-hand side of the GUI editor while you were making your own GUI. Well, these basically control everything about the Control they apply to. I'll go through some basic ones in this part.
Text: This controls what text goes on that control
Profile: This controls the design of the control
Visible: This controls whether you can see it or not
Variables: This allows you to specify a variable that you want the control to apply to, like for check box controls, you can apply a Global Variable to determine wether it's checked or not.
Command: This is the command that the control has
Accelerator: This is a specific button that you map that when that button is pressed, it activates the command specified to that control.
Maxlength: this is the max length for the text on the Control, for example a Text edit control you would put a limit on to cap how many letters they can type into that
It's getting too laggy for me to type any more on this post, one second.


 Poll
Poll