Show Posts

This section allows you to view all posts made by this member. Note that you can only see posts made in areas you currently have access to.


Topics - AGlass0fMilk

Pages: [1] 2 3 4 5
1
Add-Ons / Landmine V3 - Revamped!
« on: August 11, 2011, 07:36:12 PM »
Landmine V3
by AGlass0fMilk and Darkstar

New from Milk War Co. Huge loving Explosions (HFE) division! The new and improved Landmine! The highly advanced person and vehicle sensing and terminating technology you knew and loved is now back, better than ever!* We know, you're saying: "Why revamp technology that's a year and half old?! We have Gattling Lasers and newer landmines!" And our answer is: Go forget yourself! We knew that we could make it better and more powerful than our competitors!

This landmine is very similar to the original, but with added features, fixes, and all new graphics! The leading scientist of casing research and development of the HFE division, Darkstar, singlehandedly designed the new case for the Landmine, and we must say, it is great! No ugly prongs anymore!

And you know how the old landmine only blew off their legs? This one blows of EVERYTHING!** Jeeps are gone in one bang! Tanks can take more, but not many! Your enemies won't even want to come near your base, by land or vehicle!

As before, we know what you're thinking: "What if I accidentally touch the mine after setting it, and blow my own legs off!?" Well, our team knew you idiots would do such a thing, so we hard-wired a delay system that arms the explosive 2 seconds after deploying. There is an audible *Beep* so you know when to get the forget out of there!

Now, most of the last few features are nothing new, but what's new? Well, we took your comments on our last version of this mass killing device and made some changes!


Quote from: Heedicalking
When it blows up, I get console errors.
Not anymore! Our old scientists were killed and the clever new ones dealt with that problem!

Quote from: Space Guy
It also doesn't appear to check minigame damage...
Now it does!

And before we get to the last quote, we have another new feature! With new and futuristic technology, we introduce to you the Auto-Minefield Regenerator System! This feature allows you to set so-called "spawns" that regenerate Landmines that have blown up, never reset a minefield manually again!

Quote from: ryanb31394
Seems a bit.....obvious. I mean there is a giant green landmine on the ground. What do you do? Go around it. :/
And with this, we are proud to bring you our favorite new feature! The Auto-ChromaEnvironment Detection (ACED) system! With top secret undiscovered material, we have made the Landmine detect the color of the first environment it comes in contact with, and change accordingly! Never have your landmine avoided again because you're in an environment that contrasts with the default Green color! Your enemies will never know what they hit!

**DISCLAIMER**
Milk War Co. and it's Huge loving Explosion (HFE) division are not responsible for accidental damage to property and buildings, loss of limbs, maiming, death, loss of hearing, loss of loveual drive, and murder of visiting in laws by your crazed spouse as a result of using this device. And as always, have a blast!


*And not to mention, bug free, with no console errors like the last version that got failed on RTB.
**Results may vary


Now let's get down to business. Here's the serious stuff. But first a message from AGlass0fMilk:

It's been a long time since I've modded for Blockland. Landmine V2 was released over two years ago, but I decided to revamp this mod because of you guys. After recently coming back and reading some forum posts about my landmine, how it's being traded as a classic, and (I guess) rare mod, and how people still use it and love it, I decided to make this mod even better than it already was (Not to mention, removed the errors that got it failed on RTB in the first place). Although I may not get back into Blockland modding (I've moved on to other Programming ventures), I hope you guys enjoy this add-on. Blockland got me into programming and has changed my choice of major and career, and as a result, essentially the course of my life. Thanks for getting me started!

Please cry on the dotted line below

------------------------------------------------------------


UPDATES AND SERIOUS stuff

TL;DR starts here

Now for the features, new and old!

The Original landmine did this:

Killed people and vehicles on touch
Blew off peoples legs, forced them to crouch
Had two second delay
Caused Console Errors

This landmine introduces a couple of new features along with the above that are shown in the pictures below. These include:

Fixing the errors previously described, it is (hopefully) RTB ready!
Minigame-only explosions and maiming - Hopefully this is done right, but send me a bug report if you experience weird or undesired behavior

Made the loss of limbs less stuffty including:
         -Randomized Limb Loss! You can lose an arm, a leg, or an arm and a leg! Nothing, or everything!
         -If you happen to lose a leg (or two) you are changed into a slow playertype that cannot move while
standing, and moves slowly while crouching, cannot jump high, and cannot jet at all.
         -Removed forced Crouch animation that was glitchy and stupid looking (if you know how to force someone to crouch normally, I'll give you credit if you share it with me, no client-sided solutions!)

And the three big updates:

You can now spawn the landmine on vehicle spawns so you don't have to reset minefields! Host cool minigames of survival, a great mod for deathruns and such! The landmine is set to the color of the brick (if enabled in the spawn's menu) or is a default off-white color (Thrown mines are green by default)

All new model by Darkstar! It looks very cartoony and blocky, better than the old version (no offense Muffinmix, if you happen to ever read this). Muffinmix made the old model, and I thank him for making the model many came to love.

And my favorite update:
Auto-Chromaenvironment Detection (ACED)!
Of course this is just the humorous, commercial name for the feature, what it means is that it detects the color of the first brick it hits and the mine changes color to it, for camouflage. But watch out! It only sets once! (Also, the method I used for detecting bricks [thanks to Rampaging Vehicles mod creator for idea] is kinda inaccurate so when throwing the mine on the ground of a map, not bricks, it may change color to the nearest brick, but not really a big problem).

Also there, is a command to clear landmines, as they might become laggy if abused. It is /clearLandmines

I hope you enjoy the updated version (and that it passes RTB inspection), and as always, have fun!

PICTURES

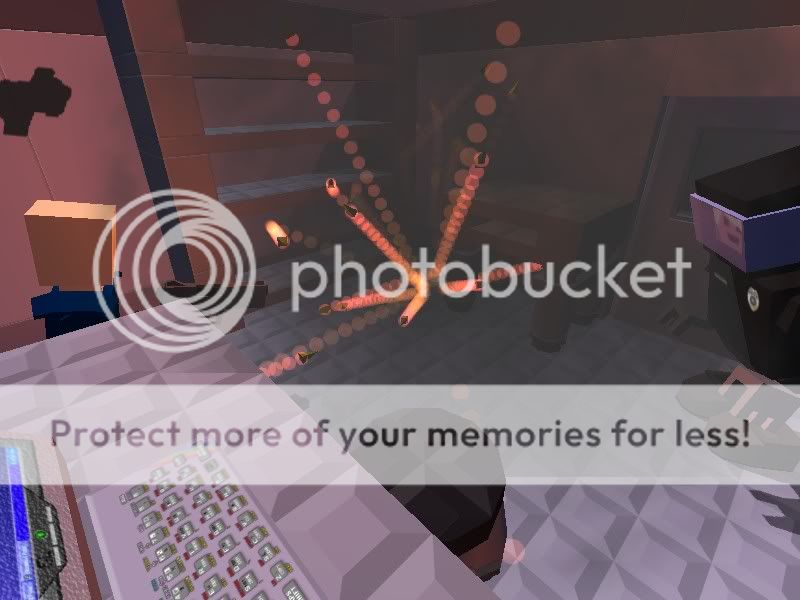
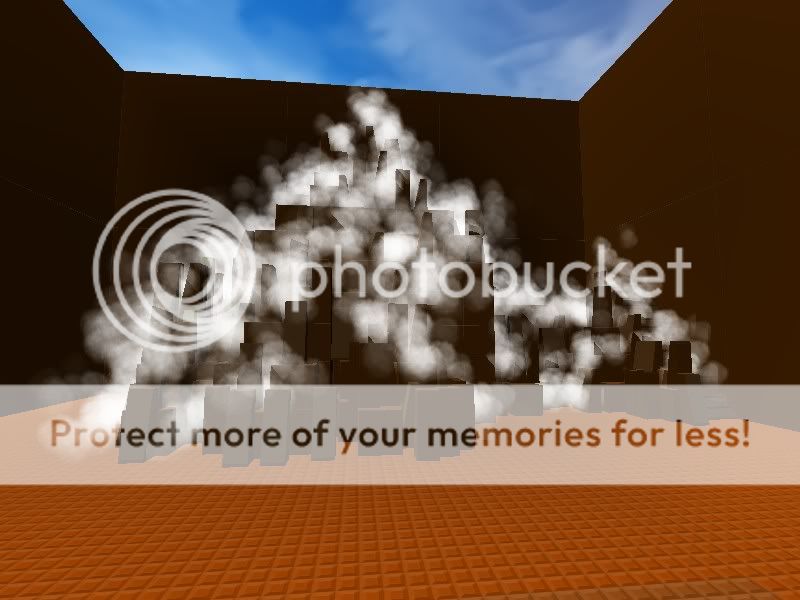
What a man doesn't know, won't hurt him, right?


Pictures of the ACED system in action


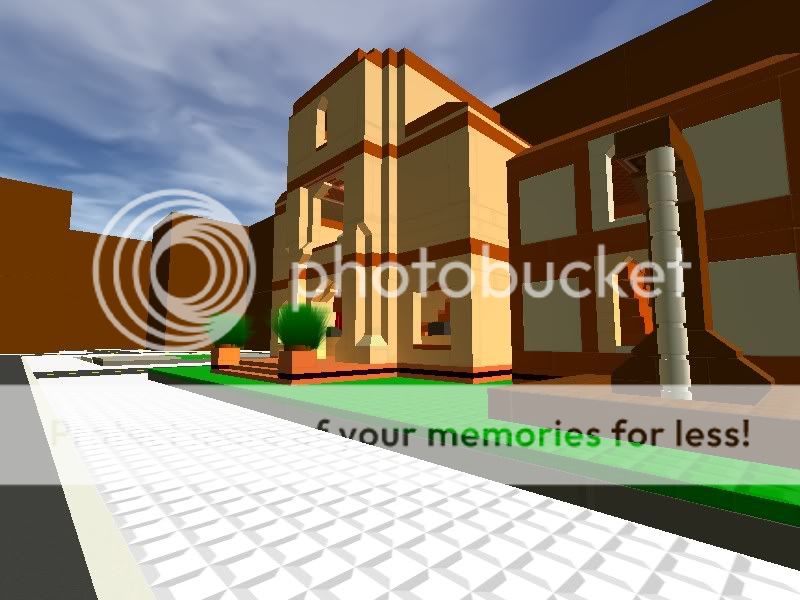
Pictures of the spawning system (with recolor vehicle enabled)


Custom CI death image (edited falling damage CI)


Custom Item Icon as shown before, shows the model so don't whine.


A man unlucky enough to live through an encounter with Landmine V3

I hope you enjoy this version 100X more than the last! Thank you guys!

DOWNLOAD
HOW TO INSTALL


SMALL UPDATES:
-Made it work with bots (kills the one that touches it)
-Clears thrown Landmines upon minigame reset
-Clears thrown Landmines upon minigame end
-Less Damage


Also, Notify me of any bugs you encounter with this mod, there are bound to be some since I have introduced so many new features in one release (and I'm a bit rusty with TorqueScript). PM me here on the forums or email me at AGlass0fMilk@live.com

2
Modification Help / Detecting Vehicle Collision with a brick
« on: August 11, 2011, 11:10:48 AM »
When trying to check for a collision with a brick using the vehicle's "OnCollision" method, I noticed that bricks did not cause the execution of that function. Is there any other way you know of detecting when a vehicle collides with a brick? (Vehicle does not have tires to stop it from hitting the brick)

3
Modification Help / [Tutorial] How to make Item Icons in Gimp
« on: October 02, 2010, 02:26:27 PM »
How to make Item Icons in Gimp
by AGlass0fMilk

I know there is already an Item Icon tutorial out there, but many beginning modders still don't know how to make these little things. This tutorial is about how to make Item Icons specifically for Gimp as many image editing programs have different controls. This is going to be slapped together quickly but it will roughly follow the steps that you should follow in order to make an item icon using Gimp. This tutorial was requested by Atom (at least that's his name on RTB), so here we go.

For those of you who do not have Gimp, you may download it from their website here.

Also, before we begin, this tutorial uses a template that all item icons should have. Please download it now before starting:

Right-click image and click "Save Image As..."

Section 1: Getting an image of your item

In addition to the template above, before you can start making an item icon, you must have a picture of your icon-less weapon or item. To make the editing process easier, the item should have a solid background (preferably a solid white background). But you may be asking: "AGlass0fMilk, how do I get a picture of my item with a completely white background!" Well, you're in luck because my tutorial specifically shows you how.

Open up Blockland and start a mission on the default map Construct. Make sure your add-on is enabled or this is completely pointless. For this tutorial, I will be using Atom's unreleased Bioshock Tommy Gun.

Once your mission is loaded, open the brick selection window. Scroll down to the bottom of the "Bricks" tab and select the largest print brick, the "1X4X4 Print". Now make a wall, approximately 4 bricks by 3 bricks, doesn't really matter. Make sure the wall is white. Using print bricks provides a seamless wall, check out the picture comparison below:


Without print bricks


With print bricks


Now you may be asking me: "The wall appears off-white! Why doesn't it blend with the map?!"
There's an easy fix to this, but first, for the sake of visibility, put your weapon on the wall, using the weapon position and weapon direction options to orient it properly:


You may just want to make the bricks invisible, but you may also paint the wall with the special effect paint, Glow. This will make the wall match the background and blend in.

Compare:


Now that that is done, screenshot the weapon on the wall (press Cntrl-P). You may take a straight-on picture, or angle it how you like. It should end up like this:


Section 2: Preparing the Image

Now that you have the an image of your item that you want to use, you can start to edit it to make it into an icon.

First thing you have to do is obviously, open Gimp. For those of you who do not have Gimp, you may download it from the link above, and then install it (if you can't do that competently by yourself, you shouldn't be here). Once you open Gimp (which for some reason takes a while, especially for the first time),  open your unedited image. But you'll notice, if you were to copy and paste your gun as-is into the template, it would be too big, as well as have a white background, thus not allowing the nice transparent circle to show through. In order to fix this, first we need to select only the item. On the toolbox, select the magic wand. This tool allows you to select specific parts of an image (for those of you not keen to Gimp, visit the diagram at the bottom of this post). Now, using this tool, click the white background. Now it may seem that you have your item selected, but press cntrl-X (cut) and you will notice that it is trying to cut the white space. To select the entire item, right click the image, scroll to Select, and then click Invert (see picture below). This will invert the selection from the white space around the item, to the item inside the white space.


Now, press Cntrl-X to cut the item from the white space.

In the upper-left-hand corner, click File and then click "New" to create a new image. When a prompt appears to select the size of the new image, estimate how big your item is and then create the new image.

Before you go about pasting your item into the new image, we need to make the background transparent. To do this, right click the blank image and scroll to Layer, then scroll to Transparency, and click "Add Alpha Channel."


Now don't paste just yet! You will notice that the white background is still there even after adding the alpha channel. In order to fix this, select the eraser tool (see diagram at bottom post, although it is the tool that looks like a big eraser) and erase the white background, a checkered pattern should appear, this represents transparency:


Now that we have a transparent background, you may paste the item into the image, press Cntrl-V (paste) and it should appear. If the lines/box around the item won't go away, right click it and scroll to layer and select "Anchor Layer"


If your image comes out anything like mine, with a white outline/white holes in it, you may be asking: "How do I fix this?" Well, here's the only real work involved with creating item icons. Technology can't always do things perfectly for us. So you must delete the white that remains by hand. You may use either the eraser or the magic wand, but I use the magic wand because it erases multiple white parts at a time. To be more accurate, you must zoom in using the Zoom Tool (see diagram at bottom of post, it's the tool that looks like a magnifying glass).

*Hint* There is a glitch with Gimp that I sometimes get where it zooms in to something ridiculous like X26000. In which case, hold down cntrl and click, this will zoom out

Anyway, zoom in and start erasing the white space, it should come out like this (or whatever your item is, minus the whitespace):


Then, at this step, I would save so you don't have to do this again in case Gimp or your computer crash. Save it as like "Insertnamehere - Transparent"

Now you are almost done editing the image to make it into an icon.

Section 3: The final step, finishing the icon
Now, download the item icon template at the beginning of this post and open it in Gimp. Take your transparent background item image and use the magic wand again to select the item (select transparent and then invert the selection again, as we did in Section 2). Press cntrl-c (copy) to copy the item and then select the template's window and press cntrl-v (paste) to paste the item into the template's image. Now it's time for you to say: "But wait! The item is too big and it barely even shows up! WHAT AM I GOING TO DO THIS IS NEVER GOING TO WORK AHHHHHHH!!!!!" But before you pull the trigger on your 9mm, notice that Gimp has a couple of tools to help you out in this situation. Select the Scale tool (see diagram at bottom of post) and click on the item. A window will open allowing you to scale the item. But before you go messing around with those numbers, we don't want an extremely distorted and out-of-proportion icon, so make sure that the broken chain link is connected:


Now, scale your item to a reasonable size, not too small, and not too large. We want the item to fit inside the box, not necessarily inside the transparent circle, it may overlap that, but any part that is outside of the image's bounds will be cut off.

Now we could just leave it straight accross and boring like it should be right now:


Or we could rotate it to add a cool perspective. So I think we'll do that. To rotate an image, you must use the Rotate Tool (see diagram at bottom of post). Select that tool and then click on your item. Rotate it to a reasonable angle (I did about 30-35 degrees) and then right click the item, scroll to layer, and click anchor layer.

Now it's done! We have a cool icon that not only adds that much more to your weapon or item, but it was easy to make and fits in with the default add-ons just as if Badspot had made it!

This is not nearly as boring as the above icon:


*Note* It may seem that the icon is very dark in Gimp, this is because of the dark checkered background. If you open it after you save it, it will appear lighter

Here is the final product:


Now, click file in the upper-left-hand corner and then MAKE SURE to click "Save As..." otherwise, you'll save over your item icon template, which you may want to use in the future! Also, MAKE SURE to save your icon in png file format, this is what file type Blockland uses for item icons.

Now you can package it with your add-on. I will not go through the steps on how to add the icon to your add-on (or show an in-game shot of the demo icon because I don't want to edit the file...) because if you're a scripter, you should already know how to do so. I will add this section if I get enough requests for it.

Post any additional questions or point out mistakes I made in this thread, or you may contact me by PM, email, or phone.

My email is AGlass0fMilk@live.com (it's a zero, not an O)
And my phone number is ███-███-████

4
Add-Ons / Flash Grenade - OLD VERSION NOW AVAILABLE
« on: February 28, 2010, 04:35:06 PM »
Flash Grenade
Like the old one, but better
by AGlass0fMilk and Darkstar


You've been in Deathmatches before... same old thing every time... I shoot you, you shoot me. But haven't you ever wondered if there's more? Well... not really, but this new and improved flash grenade will not only spice up the battle field, but it will make your enemies useless in a fire-fight.* The professionally designed canister that contains our advanced flash grenade technology was designed by our top modelers scientists, lead by Darkstar, to cause maximum disorientation. Imagine that you and your team-mates are breaching an enemy camp or clearing a room swarming with Op-for, normally you would have to rush in and you may lose a couple of men during that process. Well now you can just toss in one of these fancy canisters, and bang! They can't see, they can barely move, they hear annoying noises** and then you and your men can go in there and tear 'em up! Milk War Co. guarantees that you will love this weapon so much, we are going to give you a lifetime supply FREE! You heard read that right, absolutely free! And if you don't like them, well too bad! you can just delete them off of your computer! You have absolutely nothing to lose, so click the link at the bottom and download! As always, have fun!

*not guaranteed, effects last depending on how they are looking at it at the time of detonation, effects only last a short while.

**Milk War Co. is not liable for lawsuit for raping of your ears and/or breakage of your audio-output devices and does not take responsibility for broken limbs, strained arms, your in-laws visiting, or any other misfortune caused by this device.   Feature Removed


Now that that annoying commercial is over, let's get down to business. This flash grenade does not only blind your enemies, it makes their 'ears' ring, makes their camera shake, and slows down the time-scale (client-sided) and over all disorients them in a battle. The blinding, slowing, and sound effects don't happen through bricks (save for windows), other players, vehicles, or interiors, and how long they last depends on the angle you are looking at it when it explodes. It has a custom explosion sound, and a custom annoying sound. The model is by Darkstar, and the base script was provided by the team that set the standard for grenades, the HE-Grenade team, without them, such good quality grenades would not be as common as they are. please don't whine about credit

I hope you like this grenade, I am most likely forgetting features. This will probably be my last add-on, as I started this in Nov/Dec of 2009 and didn't feel like finishing it until now.

Here are some pictures:

Breach!


"They'll never know what hit 'em!"


"WTF?!?"


Model with transparent background


Icon


Custom CI
P.S: You aren't supposed to kill people with it


HAVE FUN!


HOW TO INSTALL!


Report any bugs or suggestions to me via e-Mail

I will take out the Timescale thing if anyone experiences glitches that are debilitating to the game or if many people suggest it, also, the host will not be affected by Client-sided timescale slowing, as it would cause a so-called "strange lag" to other players on the server.

UPDATED
I took out the "deafen" sound feature because I have gotten numerous reports saying that after a while, it just keeps deafening you forever. I don't know what could be the cause. Trivial feature, un-comment out the lines if you still want this feature, or just don't download it.

And because I think more people liked the sound than those that didn't, here's a link to the old version
OLD VERSION (With Sound)
-Note, the zip is named FlashGrenadeV1
-Another note, I did not fix the sound glitch thingy

5
Modification Help / In need of a modeler
« on: February 15, 2010, 11:45:56 AM »
PM or add me on MSN for details, must be able to export to DTS and do other stuff modelers do.

6
Add-Ons / Fragmentation Grenade
« on: November 27, 2009, 03:53:22 PM »
Fragmentation Grenade
by AGlass0fMilk
New from Milk war co! It's the Fragmentation grenade, commonly known as, the frag grenade. Here at Milk war co, we know that you want the finest and most effective weapons to kill any sort of enemy that crosses your path. Although this grenade has the explosive power of a cherry bomb, it's not the explosion that will kill people. Your enemies will have to fear the numerous amounts of shrapnel that come flying at them.

The state of the art casing is not our design though. The credit for the design and the creation of the Frag grenade casing goes to Pandan co. SimpleWell (model by him if you didn't get it). His design incorporates style, and functionality all in one deadly, explosive package. The casing is designed to spew that fatal shrapnel outwards, towards your enemies. Remember, grenades are fun!

*Disclaimer*
No one under any circumstances should ever use a grenade, they are not, fun, they are extremely dangerous. This grenade only has a 4 second fuse, so let go of it before it explodes in your hand. Milk war co is not responsible for loss of limbs, death, maiming, killing your best friend, killing your great aunt's mother's son's daughter, and loss of lunch money.

_____________________________ _______________________

If you didn't catch that, this grenade includes a couple cool features all it's own:
  • Shrapnel
  • Cooking (holding it and it explodes sooner)
  • Exploding in your hand after 4 seconds
  • And other stuff I'm forgetting

Special thanks goes out the He grenade team for the basis of the grenade code, and Ephialtes for the particles and the shrapnel. Without you, this wouldn't look nearly as good (I suck at particles and whatnot, trust me).

Here are some pictures so you don't say: "LOLZORZ NO PICKXCSGJL: NO CLIXES"

Item Icon


Recommended use in enclosed areas, then get the f*&^ out of there (unlike I did)


Booom


How to not cook a grenade


Me holding it (Thanks to Pandan for the model)

DOWNLOAD
New sounds
HAVE FUN

7
Modification Help / Canceled Schedules
« on: November 20, 2009, 04:12:28 PM »
It seems that when I use a schedule, then cancel it, it still registers as an object. Is there a way to "delete" a schedule so that isObject(%sched); doesn't return 1 even after it's canceled?

8
Creativity / Some music
« on: September 12, 2009, 06:36:22 PM »
I've recently started working more on piano, and I'm looking at pieces by Isaac Shepard. I am working on 'Leaves in the Wind' and this is what I have done of his song 'Triumph of Love'.

Tell me what you think.

Listen here

My recording equipment (Audacity and webcam mic) sucks, so yeah...

9
Off Topic / Hangman
« on: September 03, 2009, 12:49:52 AM »
I was playing around with C++ a bit and I decided to make a game.

I made hangman.

I'm pretty sure you're all familiar with hangman but if not, read this

It reads words from a text file. I've included 3 different files of words that you can use. One is basicWords (25 words, the original library I used in developement), another is words (this is used by default, around 2,800+ words), and holyshtWords (around 14,000+ words). You can read the readMe.txt for more info.

I also included an icon with it in case you want to make your shortcut (that I know you'll make for this game) pretty.

This game is simply variables and things printed to a console, but it's pretty fun. I didn't implement winning, but you can reset when all the letters are filled in.

Tell me what you think :D

DOWNLOAD HERE

Make sure to unzip it (it's zipped so I can upload them all in one file). To play, run the Hangman executable (it's not viruses)

The icon is in ico format so I can't attach it (or upload it to photobucket)

10
Games / Final Fantasy Tactics
« on: August 19, 2009, 03:25:16 PM »
Final Fantasy Tactics is a 2.5D Isometric tactical RPG that was originally released in 1998 (for the US, 1997 in Japan). Several years ago (like 6) I got this game and I loved it. It's still my favorite game today. A couple years ago they had remade it for the PSP in 2007, and re-vamped it with cell-shaded cutscenes, some new music, new job classes, and a lot of other new stuff. The newer versions name is Final Fantasy Tactics: The Lion War. Too bad I don't have a PSP :(

But still, I wanted to know how many people have played the original game, and what their thoughts on it are.

The music is amazing from it, and in my opinion (and for that matter a lot of other people) think that it is one of the greatest RPG's of all time.

I want to know what you think, if you have played it.

11
Add-Ons / Redo
« on: August 08, 2009, 12:18:08 PM »
Redo
By AGlass0fMilk

You know Undo! Meet Redo!

Well, a while ago, I was building and it occurred blatantly obvious to me that we have undo, why not redo? At that time, I didn't have the coding knowledge (or skill) to make such a mod. A couple days ago, I picked this one out of the dusty archives of my coding projects folder, and said "Let's have another go at this one." Over these past few days, I have been making this work with the things Undo does, and fixing the many bugs it has. And now it's done, so here it is! Redo!

Now onto the information about this command.

This command is sadly, not client-sided. And I have no intention of making it client-sided. In order to have the keybind for it (by default it gets bound to cntrl-y, but you can switch it in Options) you have to have the redo command as it comes with the client-sided file that give you the keybind. Otherwise, you can type '/redoBrick' to do it, but it's rather slow. It currently redoes bricks, Painting, ColorFx, ShapeFx (Undulo), and Prints (like Undo). I made the default limit of the back-history for Redo 500, but you can change it using the RTB server control (Requires server restart). I don't know what else there is to say. This is for those "oops" wand moments on floors (better for small builds =I) and when you undo something you didn't want to. It doesn't apply events, lights, emitters, or items back to the recreated brick, maybe in a later version. It doesn't redo entire builds at a time if you wand a baseplate with only one press of cntrl-y, as Truce said it should, but I hope this revolutionizes building.

Tell me of any bugs you find and I will probably fix them if they are major. Have fun!

Pics:

No it's not camera magic, it actually works


And it works on Prints, ColorFx, Painting, and ShapeFx like I said above!

Download it here! Snipped until floating bricks are fixed

How to install add-ons

12
Off Topic / [Game] Picture posts
« on: August 06, 2009, 02:05:10 PM »


13
Modification Help / Created Brick Trust Problems
« on: August 06, 2009, 12:08:16 AM »
Well, for a mod I'm making, I use this code:
Code: [Select]
            %newBrick = new fxDTSBrick()
            {
               position = %pos;
               rotation = %rot;
               angleID = %angleID;
               colorID = %colorID;
               colorFXID = %colorFXID;
               shapeFXID = %shapeFXID;
               printID = %printID;
               dataBlock = %datablock;
               isBasePlate = %isBasePlate;
       isPlanted = 1;
               scale = "1 1 1";
               client = %client;
            };
To create a new brick. But for some reason, you can plant another brick inside a brick using this even though Badspot said:
It is implemented in c++ when you call .plant on a brick.
To me asking:
Quote from: Me
I was wondering if you could tell me your method of detecting if a brick being planted is overlapping another brick. I was planning on using a box search, but I wanted to see what you did first so I can do it the right way. How would I do this?

Thanks.
I don't know why .plant isn't detecting overlapping bricks when you plant it. I was trying to use box searches and whatnot, but turns out that Box searches are
Quote from: Orion Ezel at Garage Games
The world has a grid of "bins" overlaid on it, which is used to dramatically speed up proximity searches,
so this is probably returning the first object in the "first" bin which is in the container,
where "first" bin is in bin-order, which, yeah, is probably world-aligned.
So box searches aren't as accurate as I need them to be for this search. If I use a search, if a brick is near, it won't plant because it's in the same "bin" as the search and will think that it's overlapping.

I don't know how I would fix this, or what I'm doing wrong to make the .plant() method not work for detection of Overlapping. Or if Badspot said something that I'm not getting. I don't know what other options I have, so I need some help.

My code is this:

14
Modification Help / Script Objects
« on: August 03, 2009, 05:41:05 PM »
I haven't really worked with Script Objects, and I need to know a couple things about them.

How would I read different lines of a script object, or how would I read them in general through code?

What are those Push/Pop commands for Script Objects?

How do I write things to my Script Objects?

What are Script Objects?

If you can answer any of these, please do.

15
General Discussion / DarkLight's City Rp - Yeah, It's back!
« on: August 02, 2009, 01:08:58 PM »
Many moons ago, there was a City Rp that rivaled many other good ones that are now lost to the ages, DarkLight's city Rp. After an unfortunate computer crash, DarkLight had lost all of his old files. For many months, the City Rp was lost, it seemed it would never return. But just recently, Tezuni had produced an ancient file of the RP from January of this year. And now it's back! Through all these months, I have kept many things from that City Rp, the client files, the Saves I had of the city. And now, back with the old build, and client files, we are up and running again! We plan to fix many bugs, and we plan to update it and make it better! Many of the original things that you knew and loved are still here!

A little while ago, the admins that still play (only the ones that noticed the server) all had a reunion:


Now the Rp is back and here are some screenshots:

The old fountain made by 2D in the center of the main city.

The same old police station!

The mine that 2D also built

The mine from a different perspective.

My mansion, it's not near the street yet though D:

Milk and Gold Square in Disco town (Slayers city), with a mine that tunnels under the towns main office, by Me and GoldenBoy

And I hope this gets out to Epic Cookie, because we need someone to be the mayor of his town D:

The huge-ass highway is still here, but sadly Leopards (formerly Leopards 2), your city is not there anymore :(

We plan on re-vamping the entire City Rp, and updating many things. Including the Cell phone Gui (this one made by me)

And this is the old Cell phone GUI. It's not very pretty

DarkLight is alive and well, and he welcomes all the old admins, and old memorable players back to his city rp!

Here's some of the old admins:
  • AGlass0fMilk
  • Slayer
  • 2D
  • Leopard (formerly Leopards)
  • Leopards (formerly Leopards 2)
  • DarkLight
  • Oxcorp
  • Tezuni
  • Khyere
  • GoldenBoy
  • Zombie Duker
  • Zeke
  • Epic Cookie
  • Woodland
  • Metal (formerly Metal Mario)
  • Elmosymous
  • Halogen
  • Brix
  • Ipquarx (formerly Avenger)
  • Willow Logs
  • Ladios
  • Tails
We welcome you all back! We miss you :(
Oh and if you were an admin there, please submit your name, I'll probably remember you, and you'll be added to the list.


So come on back to DarkLight's city rp!

Pages: [1] 2 3 4 5